The holidays are just around the corner and you know what that means – it’s time to get festive. From lights and snow to holly, candy canes, and ornaments, there are tons of great ways to get festive this time of year.
Making Nutcrackers, in particular, is a great project to take on – having been around for centuries, they’re an absolute classic and, let’s be honest, synonymous with Christmas itself.
In this article, we’ll show you how to make your very own with just a few common household items. Let’s get started!
What You’ll Need
You’ll need some basic materials and tools to make your Nutcracker, most of which can be found in a craft drawer or recycling bin.
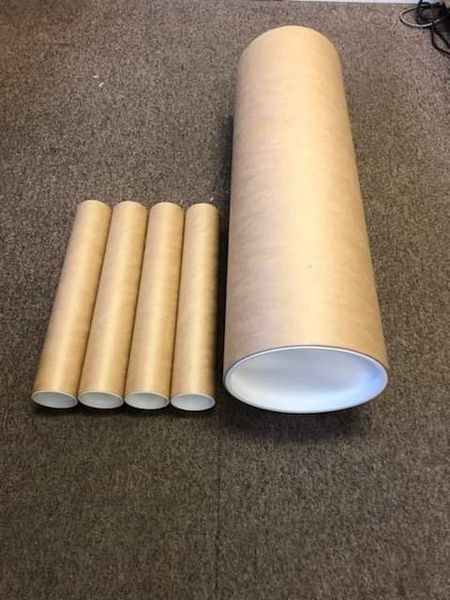
If you want to buy new tubes for your creation, take a look at our Nutcracker cardboard tube set, which will contain all the main pieces you need. This set contains 5 tubes (4 for the arms and legs, and 1 for the hat/head/torso).
Five cardboard tubes: Ideally, you should have four slim cardboard tubes of the same size to use as legs and arms and a larger one to act as the Nutcracker’s body. If you’re having trouble finding viable options, consider cutting pieces of paper or cartons and rolling them up.
A glue gun and glue sticks: You’ll need a hot glue gun to attach the different parts of your Nutcracker together. If you don’t have one, white craft glue or even tape will work in a pinch.
Paints and paintbrushes: You’ll need these to decorate your Nutcracker. Acrylic paint is best, but whatever you have on hand will work just fine.
Scissors: You’ll need a sharp pair of scissors to cut out the different parts of your Nutcracker.
A black Sharpie or other permanent markers: This is optional but can be used to draw facial features onto your Nutcracker.
How To Build A Nutcracker At Home
Got all the supplies you need? Great! Now you’re ready to build your Nutcracker with these four simple steps.
Starting The Body
You’ll want to start out by gathering the tubes you’ve allocated to use as the Nutcracker’s core, legs, and arms. Once you have them, glue two of the smaller ones lengthwise along each side of the larger tube. These will be the Nutcracker’s arms.
Attaching The Legs
Take the remaining two smaller tubes and glue them to one another, also lengthwise. Once they’re dry, add glue to the top and attach them to the bottom of the Nutcracker’s body.
Decorating
Now, it’s time to get creative and give your Nutcracker some personality! Break out the paints and brushes (and any other decorations you might want to add) and have at it. When you’re finished, let your Nutcracker dry completely.
Adding The Final Touches
Once your Nutcracker is dry, you can add any final details like facial features or buttons using a black Sharpie or other similar markers. For style inspiration, check out traditional nutcrackers or get creative and design your own unique character.
And that’s it! You’ve now got a homemade Nutcracker that’s ready to spread some holiday cheer. Be sure to put it on display where everyone can see it – we guarantee it’ll be a real conversation starter. Merry Christmas!
Have used these tubes they are great my nutcracker has been much easier because of the strength of cardboard and the end caps